First job of the day was to finally tax the camper :) Its now all legal and can be used again, been a long while, not been for a decent run since the engine blew, so looking forward to taking it out again ! :) Think its coming with me to work at the chinese on tuesday and wednesday :)
Second job was to finish off the towbar, I fitted the frame to the chassis a while back, so just had to fit the electric plate and tow ball, run the cable into the drivers side light cluster, (has to be drivers side as that is where all the cables for lights run from), then scotch lock all the wires to wire it up. If you have a 1999 T4, it may be the same for all others im not sure, but here are the wiring guides if you want to fit your own electrics too, I figured these out myself using a 12v tester.
Where I give the wire colour, obviously the first colour is the dominant colour.
12N wiring -
Function - VW Wire Colour - Tow Wire Colour1 - Left Indicator (NS) - Black/White - Goes to Yellow
2 - Right Indicator (OS) - Black/Green - Goes to Green
3 - Fog Light - Grey/White - Goes to Blue
4 - Earth - Brown/White - Goes to White
5 - Left Sidelight (NS) - Grey/Black - Goes to Black
6 - Right Sidelight (OS) - Grey/Red - Goes to Brown
7 - Brake Lights - Black/Red - Goes to Red
Hope thats helpful to someone :)
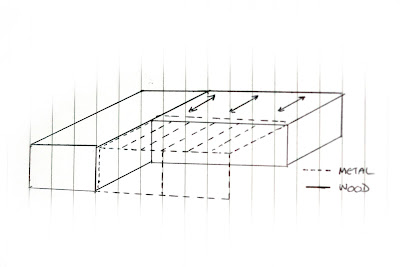
Once that was done, I set my mind to finetuning the seating. Since I built them last week, the height has been bothering me slightly, there isn't much headroom when you are sat in there, and also I wanted to try and get a little more space back for the hob and sink unit, so started on the difficult seat that goes over the wheel arch, shortened its depth by 35mm, this involved dismantling it and re-cutting the wood, not a quick job but better to get it all done now rather than finish it all off then decide I want to change it. 35mm doesnt sound alot, but you would be surprised the amount of extra space it gives you. I also shortened each seat leg by 20mm, again this doesnt sound alot, but it now feels less claustrophobic when you sit on it and the back of the seat cushions have now fallen under the bottom of the window line. Whilst the seat was out and on the bench, I also fitted the boards that I bought for them the other day, this one has 2x 9mm plywood boards, these are strong and once supported by the seat carcasses will even take my weight ! The seat has two, one hinged from the back of the seat so you can lift it up and use the space inside the seat as storage, the other board is on top of the first one and hinged from the front, so when you take the cushions off, the board will swing out and form the bed. Quite pleased that this actually worked ! :) I may need to shorten the depth of the top board, as the metal pull out frame that it will be resting on, may need to be shorter, so that the board overhangs a couple centimetres, this wont affect the strength, but means that I only have to make cut outs in the front of the seat to accommodate the metal struts that will be going through it when the seat is a seat. If I do them full length, it means the struts will have to go out the back of the seat when folded away. When I make the cutouts in the front of the seat, I may have to add a couple strengtheners as the main piece of wood across the front of the seat supporting the boards, will be weakened where I cut the channels out for the metal. Dont worry if you havent a clue what Im on about :) Im just thinking out loud about what i need to do !
The pic below shows what the bed will look like when pulled out, everything is just balanced in the pic at the moment, but will be pretty strong when done.


Actually starting to look like a camper now isnt it :) The seat cushions are quite firm and very comfortable, I think Im going to sleep on them just fine ! :) In fact Jen joked tonight that we should bring them in for our bed as our mattress has springs poking through now ! Must stop spending money on camper and buy us a new mattress for the bed ! :P
This pic below, is my idea on how I am going to face the seating, using left over laminate flooring, so that it matches, and is pretty cheap, I will need to go buy another pack, but the pack only costs £9.69 and will be more than enough. The aluminium angle strip is left over from the flooring where I finished it off at the back, think this will look good and hide the bare wood and metal, so need to buy another strip of that too. All in all it will all match from the floor upwards, so looking forward to that being done and then I can bolt down the seats through the floor.

Whilst I was out working on the camper, Rob from up the road walked by with Dusty and Harvey, and stopped to say Hi, whilst we were chatting I was telling him about what I had to do still, and mentioned the material I bought for the curtains, Jen hasnt gotten around to asking her friend yet as she has quite alot on her plate, so told him I needed to find someone to make them up for me, and it turns out his mum makes curtains for her job ! How cool is that :). So just need to double check my measurements, and then will ask Rob to ask his mum to do them, another job done :). Actually cant wait to put the curtains up, then we'll really be in camper land :). Need to find some curtain track now though, and its not cheap ! I think Golden Castle Caravans had some in 2 meter strips for about £20, I think thats really expensive for a metal strip, the awning rails were way cheaper than that for 3 meters ! So will hunt around and see what I can come up with, the rails have to be bendable to fit the different profiles that the camper has.
Think thats it for today, oh I did remove the electric hook up socket and wired some cable to it, need to refit that tomorrow and leave the cable trailing ready to wire in to the consumer unit once I build a cupboard to install it all to. More to come tomorrow I expect, things seem to be getting done at a pace now when I do actually get out there and work on it. Still have the other seat to adjust tomorrow too.
Come back soon ! :)
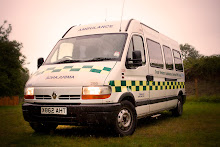

.jpg) And this is how I took his photo, on our driveway, in the dark, using my camper canopy to reflect the flash light back down onto the white vinyl background, so the camper is going on its first official (well non official as I turned the offer down !) working job tomorrow :).
And this is how I took his photo, on our driveway, in the dark, using my camper canopy to reflect the flash light back down onto the white vinyl background, so the camper is going on its first official (well non official as I turned the offer down !) working job tomorrow :)..jpg) This is one of the reasons I wanted a camper, for going out on photo meets with other photographers and being able to have a chat and a drink afterwards, which is why I was so insistent on the L shaped seating, easier to talk to people than the normal rock and roll style seats where you sit next to each other in the forward position.
This is one of the reasons I wanted a camper, for going out on photo meets with other photographers and being able to have a chat and a drink afterwards, which is why I was so insistent on the L shaped seating, easier to talk to people than the normal rock and roll style seats where you sit next to each other in the forward position.


 Thats about it for tonight, quite a good bit of progress, will take some more pics when I sort the metal bed frame out, and finish off the seating so you cant see inside the carcasses, also need to get the seat boards too, as well as taxing it ! This isnt a cheap hobby this converting :)