Friday 27 February 2009

Bit of an update, although nothing more has been done....

Haven't had time to do much over the past 2 weeks, although I have been stocking up on the materials.
On wednesday during work, the central locking decided to stop working, tested the feed down to the "brain", and there was no power, so will have to trace the loom back and find the fuse, I think that may have blown. Also this week the LED interior lights stopped working, yeah I know its been a great week for it !, anyway the original bulbs were left in the glove box, so popped those back in and to be honest its nice having normal lights in there again :).
This is the stuff I now have here that needs to be fitted -
  1. Window Tint
  2. Yellow Carpet
  3. Blue Carpet
  4. 4x LED Roof Spotlights
  5. TV Roof Mounting Bracket

There are lots more things I need to get, but they will have to wait until more funds are available ! Its not cheap this converting :) In the mean time, I have plenty to be getting on with when I get the time. This weekend I plan to tint the windows, and maybe fit the roof bits so I know where to carpet when I get around to that.

Saturday 14 February 2009

A Few More Things Done.......

Ok, today had some proper time to spend on NormanII, so decided to get the plywood sheets that have been in the shed for ohhh about 7-8 years :). It had gotten damp at some stage, but dried out, so should be ok. Anyway, starting from scratch on lining out the back of a van is hard ! But got there, started of by measuring a rough size without any curves or cutouts, for anyone that is doing the same thing, I started on the OS back panel, and the size I cut was 51" high by 42" wide. I then placed this against the wheel arch to mark out the width of the arch, making sure I had it in line with the back of the van, I then stood the wood up and marked out the height of the arch and drew a rough arch out in pencil, I then cut the arch out and stood the wood up again over the arch, at this point I had cut too much away from for the arch, (using a jigsaw), but that was ok as this piece was going to be my template for the proper pieces and I could adjust for this later. I now marked out where the curve at the back top would be, the left hand side I didnt need to worry about as I was leaving that straight. Once I got it fitted ok, I made a note of where I had been over aggressive with my cutting and laid it across a new sheet of wood, 3mm plywood, marked out the modified panel, and then using the jigsaw, cut out the new panel, fitted this against the van and made sure it was definately ok, it was :), so used this new panel to mark out another one as the NS rear panel is exactly the same, that was the rear covered, as my sliding door and rear door were already lined, the onlyother panel was the one below the OS window, which was a standard 47" wide by 27" high, no curves. As time was getting on, I realised I didnt have a drill bit for the job, so spent a while in the loft finding some old ones, 2 of the 3 broke fairly quickly, note to self pick up a pack of 3mm HSS drills from screwfx, preferably Dewalt ! Got the panels fixed up, but need to finish off. Makes sure when drilling you only drill through the box metal that has a cavity, you dont want to be drilling straight through the outer body ! This is how it looks now, still some finishing off, and when funds are available, it will all be taken back off, and the space behind the wood will be fitted with insulation, I have decided to go ahead and use Kingspan as suggested by Martin, the guy from ebay that I bought the conversion guide from, have been down to B&Q and the have both the 25mm (for the top half) and 50mm (for the bottom half), 25mm x 4ft x 8ft is £17.99, and the 50mm x 4ft x 8ft is £27.99, one sheet of each will do the job. Then get the carpet :). This is how I left it tonight ...


Once I had hit a brick wall with the drill bits, I turned my attention to the remote central locking kit I had bought from ebay, Norman II has got a kit fitted, by the original owner, but it wasnt remote and would only work on the key from the passenger side, so started pulling door panels off and seeing what I was dealing with. The kit I bought from ebay consisted of 4 actuators, these push the locking rod up and down, rods to connect to existing locking rods, clamps, screws and the "brain" box. As I pulled the panels off I realised that all three doors, excluding the rear door, but including the sliding side door, already had actuators fitted to each of the 3 doors, which got me to thinking if I could get those working properly, I wouldnt actually have to fit the actuators from my kit, could keep them as spares, and just rewire the loom at the "brainbox" end to fit the new "brain" that was in my kit. So followed the wiring to the box which was down by the fuse box, unplugged it to see what the plug looked like, it was different to mine, same colour wires but in a different order, so cut the plug off of my new wiring loom, discarded the loom, and then cut the plug off of the fitted one, took a bit of fiddling, but managed to wire it so that the drivers door opened on the remote, the passenger side and sliding door werent working all the time, so sprayed the mechanical parts of the sliding door lock, and had to re-adjust the locking rods and clamps in the passenger side door, after some more fiddling, I now have remote central locking that works on all 3 front doors, the rear door still works on a key, and I will leave that as it is, I only really needed the 2 front doors to be remote locking anyway. Will make things so much easier doing the chinese now :) Bit of a pain having to stop and lock the van up with the key, and then make sure the passenger side hadnt opened at some stage, all is working as it should now, so im pretty pleased :), the kit came with 2 remotes.
Thats all for now, next thing is to grab some drill bits !


Saturday 7 February 2009

Norman II Gets A New Windscreen...

After an Icy start to the day which prevented us from going out early, 5 Valleys gave me a call this afternoon and said they were in the area with the new screen did I want it done, - yep :)


It was Dave and Martin again, good job we decided to replace it, apart from the big stonechip, the bonding had split at the top of the screen, when Dave went to put the wire through to break the seal all the way round, his wire went straight through, which it shouldnt do, so we would have eventually sprung a leak had we just repaired the chip. Fate.


Hope they dont mind, but in the spirit of this blog, it had to be documented with pictures :).

Thanks Dave and Martin, great job again, I can highly recommend them.


The Work Begins..
Screen Out & Dave Managed To Pierce His Finger, Oops..
The Clean Up & Prep For New Screen...
Lift ... 1
Lift ... 2
And Its In...
Final Push & Replace Wiper Arms...
Job Done !
Genuine Five Valleys Tax Disk Holder :), So Who You Gonna Call ?...


Its nice to get another job out of the way, with the weather and lack of money things have slowed down a little bit, so going to be seeing what I can stick on Ebay later and try to get things moving again, my Nokia N95 will be going up so if you fancy it go find me on ebay and put a bid in :). Need lots more too so a trip to the loft might be in order.
Got to leave Norman II alone for today now while the bonding sets, so can't take him over mum's in a minute, will just have to wait until tomorrow ! :)

Friday 6 February 2009

Snow Go NormanII .......


Not really an update, just a snowy pic of NormanII, and I havent even done his insulation yet ! He must be freezing ! :P

Wednesday 4 February 2009

Oh Dear.......A BLIP !

Well not alot has been done this week, due to the weather, my next job was to be tinting the windows, but it has to be done when the temperature is above 5 degrees, so not much chance this week, otherwise the next thing is to insulate the floor and the walls.


Thank you to Martin for your disk, it was very informative, the pics were great, and Im really hoping to have a good look through very soon. If anyone is thinking of converting a van to a camper, this is a must have disk. (doesnt even really need to be a VW, you can adapt most things to any van).
Ok the Blip, well as is always the case when my vehicles go wrong, Jen was the one driving, what does she do to them !??? :) Its ok Jen I dont blame you, this time. When we went to pick NII up, I was looking round him and went to start the engine, nothing happened, I queried it with Paul, and he said there was a knack to starting it, you had to lift the key slightly as it went into the start position, once he had told me that, it was fine, I did it automatically, Jen also knew what to do so all was good, then Jen needed to go to Bristol, so she took NII to do a couple of dog walks first, and said that whilst on the last walk in Tewkesbury, when she went to drive back to Gloucester the ignition wouldnt work for a few tries then did eventually, so she popped in McDonalds for a quick bite to eat, took it to a layby on the A38, stopped the engine and ate her dinner, when she went to start it again, absolutely nothing, completely unaware of the mood that awaited me, I rang Jen to check in and see how she was doing, well wish I hadnt :P. Anyway went down to where she was, tried it myself, and no matter how far round you forced the key, all you got was a slight click from the relay in the dash, so took jen on to where she was going and came back and had another quick play, took all the steering cowling apart and sprayed the ignition barrel, the contacts on the back etc, still nothing, ended up having to short the starter motor just to get the engine running, (thanks for that tip Jon, it got me out of a hole :) ), because I could hear the relay clicking, I ws starting to think that was the problem, when I rang VW Van Centre in Cheltenham to order one, the guy there said that my '99 T4 has the same ignition switch setup as the VW Polo, and they had a well known problem, his description of the switch was "awful", so this put me in the mind that it was the ignition switch and not the relay, so ordered one of those instead, thinking that the switch was going to be a horrendous price, it was actually pretty reasonable and could have been alot worse, around £22 inc vat. When Jen picked it up, the guy told here that they had modified the switch so the new one was slightly different, but went back on exactly the same as the old one. To replace it you have to take the cowling off, unplug the multi connector block from the back, and then on the left hand side of the ignition barrel as you sit in the seat looking at it, there is a very awkward philips screw to undo to release the switch, I managed to do this with the steering wheel and controls in place, but the job would have been alot easier had I taken the steering wheel off and undone the control housing to lift forward to get at the screw which butts against the steering column, I managed to get mine undone with a tiny flat blade screwdriver that fits in the corkscrew part of my swiss army knife, the type that you tighten up glasses screws. Once it was out, its very easy to put the new one in again the screw being the only awkward part of the whole job. Once it was fitted, it starts like a dream, dont have to wiggle the key when starting now, just turn the key and off he goes.
Couple of pics here to give you some visual idea ofwhat I had to do in case it happens to you if you own a T4 or Polo !


New switch on the left, old on the right, amazing this little piece of plastic can cause so much hassle !


This is the screw that holds the switch in the housing, very difficult to get at but managed eventually.


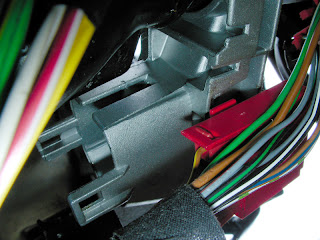
View of the Ignition Switch housing with the switch removed, this is from the left side, the slit in the metal is were the screw screws into.

View from the right side with the new switch installed and the connector block connected.

Starts like a new van now :) its nice not to have to wiggle the key to start anymore !

So thats fixed now for about £22, could have been alot worse and its a little niggle sorted, which is good :)

Got a phone call from Five Valleys today telling me they had the windscreen in now, when did I want it fitted, we agreed to talk Friday and see whats happening with the impending snow we are expected to have. (Which is falling right now as I type at almost 1am thursday morning). Anyway, it will be fitted very soon, so another job I can cross off my to do list.

Whilst at the chinese tonight, in between deliveries, I started mapping out in pencil on the floor in the back where the units would go, seats, cabinet, sink hob etc, make sure it all fitted and there was at least a little room left, all looks ok, and I can actually have a bigger sink hob than I thought, so may open up a few options. I had intended to build the seats half a meter deep, from back to front, which I thought would be ok, but am now thinking that may be a little too narrow, especially for me being a larger person !, once you take into account the back cushion, which is probably going to be made from 4" foam, it does seem a little narrow, so am going to visit a couple caravan showrooms and see how their seating is made and in what size. Also, the seat going the length of the van, I was going to make 1.5m, this doesnt leave much for the cabinet, so may now have to shorten it to 1.3m, which leaves a much more useable space for a cabine, it will leave a total length of seat / bed of 1.8m, which is just under 6ft, just long enough for us to sleep on. May rethink that and make a smaller cabinet, until I actually start building its hard to say so will work it out as I go along. I want to know the size of the seats as I want to order the foam, or at least get a quote for it quite soon.

Thats about it for now, will come back and write when I have started the next job.