Monday, 15 June 2009

Its beginning to look alot like...a camper !

Ok so how many of you have a Christmas song going through your head now ? :P
Well today I managed to resize the second seat, so both are finished structurally now, and then started facing the seating with the laminate flooring :), sounds crazy but works, and actually works quite well. I still need to finish off the edges with the 20mm aluminium angle from Focus, I had enough for 2 strips left from when I finished off the flooring at the back, that you can just about make out on the pics, but need to do some more, so I think 2 more lengths will do for now.
Not sure if I am going to use the laminate on the white units for the cupboard and kitchen yet, probably will do as its pretty thin. If I do will need alot more of the angle metal. So I didnt have to ruin the line of the metal with screws to hold it in place, I used a glue, now its either Hard As Nails or No More Nails, Im thinking it is the first one which is most likely a rip off of the second :). The laminate I fixed to the seating using some 3/4" hardboard nails, they are very tiny, and if any were to be on show, the head is very tiny and buries just below the surface of the laminate, you hardly know they are there. I bought a 40g box, think there must be at least 100 in it, for 80p from our local indoor market, same place I managed to get the curtain tape, thank goodness places like that are still alive, I hope they survive alot longer too ! Definately useful ! And I bet that the same amount of nails would have cost more like £2-3 from a DIY store.
Anyway this is the seating, not bolted in yet, still have to make absolutely sure it all works before I start drilling holes through the floor :) Again we are still undecided about the bed conversion, we are thinking that the metal frame idea is looking less appealing now the seats are built, Jen came up with the idea of building 2 cubes that will live in the seat, and come out when needed for the bed to support the board when its folded out, not very slick but practical, and maybe I can build 2 cubes with tops on and use them as small coffee tables too ?


Finally, I managed to cut the worktop too, now ive done this in the hope that I can find room for the better Smev 9222 sink/hob, this has 12v ignition and the glass covers, you can see a pic a bit further back in the blog. This top I cut to 1000mm x 400mm, I think the 9222 is 900mm x 370mm, so if I can get the worktop to fit without the bed board fouling it when it folds out, then I will be a very happy chap, the Smev isnt cheap at around £230 plus postage, but will really add a nice feature to the van which in turn will add value. Here it is resting on the leisure battery, but will eventually be on a unit and hopefully run along the line where the blue meets the yellow on the walls.

Popped in to Pearman Briggs in Gloucester again today on my way home, picked up a Tow Ball cover for my new towbar, spent an extra 50p and got the one with the snazzy reflector on the back, only the best for MY camper :)

Also bought my 12v sockets, as you can see below, they are proper caravan sockets, and fit flush to the unit you are putting them in, I think they look quite smart, but a bit of a rip off, they dont come as you see in the pic, you have to buy the socket, then a surround that screws it to the surface, then a surround to go over that surround to hide the screws, seems to me they could sell the lot in one kit and knock a couple of pounds off, but anyways, the sockets are £5.29 each I think, the first screw surround is around 99p, and the second surround I think was £1.29, thats for the single one, the double one is 2 single sockets with a double screw surround and a double finish surround, all in all what you see in the photo cost just over £20, scandalous ! The mains sockets all work in the same way, you have to buy a mountain of stuff for them and as with all caravan and motorhome accessories, pretty expensive for a slightly different look to house mains sockets, so had a quick look through the Screwfix catalogue, and think im going to go for the brushed stainless steel mains sockets with the black inserts, they look more motorhome than the usual house sockets, for a 2 way socket and a 1 way socket, plus a light switch, and back boxes, its going to be around £25 all in, at the caravan place, one double socket was £16 without the back box etc, so this is the way Im going. Just thinking to myself it will be nice to get on with the wiring because that will mean that things are almost done inside :).

By the way the double socket is for the wardrobe/cubpoard unit at the back of the van, this will be useful for the Wii or the shower or for the camera and phone battery chargers, the single one is for the seat that is behind the drivers seat, just opposite the side door, useful to run the laptop 12v charger etc, think I am going to put a mains socket next to it too and power it with a 300w invertor, this will mean I can use mains off of the leisure battery if no hook-up is available, for things up to 300w, meaning that you could use a mains laptop charger or phone charger etc. Anything that doesnt exceed 300w.

Well thats it for today, I promised myself an early night tonight and its now 43 minutes after midnight ! I hope I find this blog useful once Ive finished, after all the hours ive put into writing it :) oh and tomorrow night, or tonight if you want to be technically correct, I'm going to use the camper to do the chinese for the first time in over 3 months ! Yay ! :)

Saturday, 13 June 2009

A great day for the camper ...... :P

First job of the day was to finally tax the camper :) Its now all legal and can be used again, been a long while, not been for a decent run since the engine blew, so looking forward to taking it out again ! :) Think its coming with me to work at the chinese on tuesday and wednesday :)

Second job was to finish off the towbar, I fitted the frame to the chassis a while back, so just had to fit the electric plate and tow ball, run the cable into the drivers side light cluster, (has to be drivers side as that is where all the cables for lights run from), then scotch lock all the wires to wire it up. If you have a 1999 T4, it may be the same for all others im not sure, but here are the wiring guides if you want to fit your own electrics too, I figured these out myself using a 12v tester.

Where I give the wire colour, obviously the first colour is the dominant colour.

12N wiring -

Function - VW Wire Colour - Tow Wire Colour

1 - Left Indicator (NS) - Black/White - Goes to Yellow
2 - Right Indicator (OS) - Black/Green - Goes to Green
3 - Fog Light - Grey/White - Goes to Blue
4 - Earth - Brown/White - Goes to White
5 - Left Sidelight (NS) - Grey/Black - Goes to Black
6 - Right Sidelight (OS) - Grey/Red - Goes to Brown
7 - Brake Lights - Black/Red - Goes to Red

Hope thats helpful to someone :)

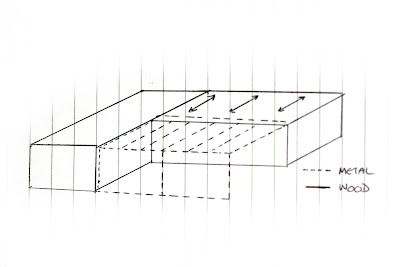
Once that was done, I set my mind to finetuning the seating. Since I built them last week, the height has been bothering me slightly, there isn't much headroom when you are sat in there, and also I wanted to try and get a little more space back for the hob and sink unit, so started on the difficult seat that goes over the wheel arch, shortened its depth by 35mm, this involved dismantling it and re-cutting the wood, not a quick job but better to get it all done now rather than finish it all off then decide I want to change it. 35mm doesnt sound alot, but you would be surprised the amount of extra space it gives you. I also shortened each seat leg by 20mm, again this doesnt sound alot, but it now feels less claustrophobic when you sit on it and the back of the seat cushions have now fallen under the bottom of the window line. Whilst the seat was out and on the bench, I also fitted the boards that I bought for them the other day, this one has 2x 9mm plywood boards, these are strong and once supported by the seat carcasses will even take my weight ! The seat has two, one hinged from the back of the seat so you can lift it up and use the space inside the seat as storage, the other board is on top of the first one and hinged from the front, so when you take the cushions off, the board will swing out and form the bed. Quite pleased that this actually worked ! :) I may need to shorten the depth of the top board, as the metal pull out frame that it will be resting on, may need to be shorter, so that the board overhangs a couple centimetres, this wont affect the strength, but means that I only have to make cut outs in the front of the seat to accommodate the metal struts that will be going through it when the seat is a seat. If I do them full length, it means the struts will have to go out the back of the seat when folded away. When I make the cutouts in the front of the seat, I may have to add a couple strengtheners as the main piece of wood across the front of the seat supporting the boards, will be weakened where I cut the channels out for the metal. Dont worry if you havent a clue what Im on about :) Im just thinking out loud about what i need to do !

The pic below shows what the bed will look like when pulled out, everything is just balanced in the pic at the moment, but will be pretty strong when done.

Actually starting to look like a camper now isnt it :) The seat cushions are quite firm and very comfortable, I think Im going to sleep on them just fine ! :) In fact Jen joked tonight that we should bring them in for our bed as our mattress has springs poking through now ! Must stop spending money on camper and buy us a new mattress for the bed ! :P


This pic below, is my idea on how I am going to face the seating, using left over laminate flooring, so that it matches, and is pretty cheap, I will need to go buy another pack, but the pack only costs £9.69 and will be more than enough. The aluminium angle strip is left over from the flooring where I finished it off at the back, think this will look good and hide the bare wood and metal, so need to buy another strip of that too. All in all it will all match from the floor upwards, so looking forward to that being done and then I can bolt down the seats through the floor.


Whilst I was out working on the camper, Rob from up the road walked by with Dusty and Harvey, and stopped to say Hi, whilst we were chatting I was telling him about what I had to do still, and mentioned the material I bought for the curtains, Jen hasnt gotten around to asking her friend yet as she has quite alot on her plate, so told him I needed to find someone to make them up for me, and it turns out his mum makes curtains for her job ! How cool is that :). So just need to double check my measurements, and then will ask Rob to ask his mum to do them, another job done :). Actually cant wait to put the curtains up, then we'll really be in camper land :). Need to find some curtain track now though, and its not cheap ! I think Golden Castle Caravans had some in 2 meter strips for about £20, I think thats really expensive for a metal strip, the awning rails were way cheaper than that for 3 meters ! So will hunt around and see what I can come up with, the rails have to be bendable to fit the different profiles that the camper has.

Think thats it for today, oh I did remove the electric hook up socket and wired some cable to it, need to refit that tomorrow and leave the cable trailing ready to wire in to the consumer unit once I build a cupboard to install it all to. More to come tomorrow I expect, things seem to be getting done at a pace now when I do actually get out there and work on it. Still have the other seat to adjust tomorrow too.

Come back soon ! :)

Sunday, 7 June 2009

Sink and Hob ........

Managed to go out and measure the space left when the bed is pulled out, its quite narrow at 325mm, so the previous Smev Combi wont fit at 370mm. Jen has found this Smev Unit and its exactly 325mm, so there wont be much work surface around it, but it could fit, just. This is about half the price of the other one, but doesnt have an ignition, and doesn't have the glass lids.

Now the bad news, whilst in the camper measuring, I had to move the seat away from the window, where I had placed the seat pads yesterday when I finished, both back pads along the window were wet, when I looked closer at the window, the rain was coming through the bottom 2 corners, so now have to give 5 Valleys a call and see if they can come out and fix it :( .

Saturday, 6 June 2009

Seat Carcasses Done, Fitted First Time ! :P

Finally got around to the seating today, originally intended to just cut the wood to size ready to put together, but ended up doing that too.

It got to the stage where I thought to myself, just go with the design in your head and see what happens, if it doesnt work out then you'll have to do it again.
Well I emptied that camper, crossed my fingers and then put the seat over the wheel arch first, then the one behind the driver seats, praying that it would fit in, it did ! For the first time ever, all my measurments worked out and it all fits exactly how I planned, how cool is that :).
This is the carcasses without the seat boards or finishing trim, at the moment you can gingerly sit in the middle of the seats where the cross members are, and they work great :). Head room isnt that brilliant, only a few inches to spare when you are sitting down, I based the seat height on caravan seats, approx 36cm high plus cushions, obviously caravans have more height, so not sure I should have made them a touch shorter, but I think the height is inline with the rock and roll bed heights, so think it will do. :) In any case I was really happy I managed to work out in my camper pad ( a notebook where all my ideas and measurments and contact details of anything to do with this conversion are, I highly recommend you keep one too if you are doing one yourself, you will find it invaluable) from the measurments taken inside the van, then cut the wood and put it together and it fitted ! I was quite worried about the seat that goes over the wheel arch and getting that right, so all's good :)


As you can see, there isnt much room in the back on the left hand side of the pic, once the seating is put into a bed. This is a major problem as this is where I had intended putting the sink and hob. Now the seats are built up, im not so sure there is enough space for a sink and hob unit. The pic below is the Smev 9222, its 900mm wide, and 370mm deep, and about the slimmest combo unit you can get, I am hoping I can fit this somehow, its pretty expensive at £240, but will be worth it if it fits and will add value to the camper. Will measure more tomorrow and see if I cant work it in somehow.

Thats about it for tonight, quite a good bit of progress, will take some more pics when I sort the metal bed frame out, and finish off the seating so you cant see inside the carcasses, also need to get the seat boards too, as well as taxing it ! This isnt a cheap hobby this converting :)

Friday, 5 June 2009

Sketchup....

Thanks to Dennis for this one, Dennis is building his own camper from a Ex Police Sprinter, you can see his blog if you google Janis The Camping Car, in his blog he recommends using a program called Sketchup to work things out before you go ahead and build things, can be anything from the seating in my camper to a childrens adventure play area.

Anyway, its a pretty cool program supplied by Google for free, and it lets you build 3d scale drawings of a design. I havent really gotten a handle on it yet, but came up with these last night, not bad for a first attempt :). This is kind of what I want the seating to be like. The metal figure 8 frame you can see is already made, im thinking of welding some straight tubes off at a right angle as pictured that will slide through the wood. The original idea was for the sliding tubes to slide inside another frame bolted on top the seat, but although it worked on paper, when I actually ordered the metal and tried to fit the smaller tube inside the bigger tube, it didnt fit. Best laid plans and all that. So looks like I have to do away with the big frame, use this small one, and then cut channels through the wood for it to run through, on the other side of the wood, drill a bolt through the end of each tube which will stop it being falling all the way out when it is pulled out for a bed. The board on top of the static seat will be doubled and hinged, and when the frame is pulled out will just open out over the top of the frame and form the bed. The tubing is very strong so should easily cope with this.

Ive left the metal exposed for the bed and frame pics, but this will be faced with matching wood all round as in the first pic of it folded back into a seat.

If anyone can think of a better way then please say asap before I start cutting things up ! :)


Today we also bought the curtain tape, its an inch wide and we bought 10 meters at 30p a meter, I think that may be the cheapest thing we've bought for this conversion so far ! :) To go with it bought some lemon coloured thread too, all we need to do now is ask Jens friend if she will do them for us, if not then it looks like I may have to have a go myself ! I think I could manage, but not sure how straight the stitching would be :)

Tuesday, 2 June 2009

Bit quiet at work tonight.......

For those of you that dont know me, I work a couple evenings a week delivering chinese meals to bring in a bit of extra cash, which is where I have been tonight, in fact one of the reasons I am doing the camper is to have somewhere comfy to sit and watch tv whilst Im waiting for the next delivery. Tonight being a classic example of when it is needed, as it was so hot, nobody really fancied having a hot and spicy chinese, so I only did 4 deliveries all night, thats between the hours of 5.30pm - 11.00pm. So as I didnt have the camper on the road and kitted out, I busied myself with trying to get rid of the headache that is the seating design as my original idea has gone to pot.

I want to use the frames we have already made with Andy, but the question was how, they had been welded together with a completely different design in mind. Well not completely different, but different enough. The metal cost me £85 all told, so I am determined it is being used somewhere !

I ended up with this design, where the 2 frames I have are welded together, the bigger of the frames that will make the seat top when not a bed is to have some more struts welded across to strengthen when it is a bed. This also means that I will have to make the wooden part of the converting seat about 3cm lower than the fixed seat, so incorporate the 20mm frame and a 10mm ply board that will make the seat and bed board. It all made my head hurt in the end, but i think I have come up with a workable design with the least fuss. One drawback is that when it is pulled out into a bed, the seat pad nearest the window will be slightly lower than the pad on the metal frame, which isnt ideal, but wont cause much of a problem either. The whole thing will look neat as a seat, and pretty comfy as a bed, and can still be used as storage. Fair play to the campervan and caravan designers for coming up with their designs, its not until you design one yourself and come up with the pitfalls that you fully appreciate what they do.

Of course this may change in time, I think I will review it again when I have made the fixed seat and it is in place.

If anyone has any better ideas using the metal frame you can see below, then do please comment and I will look into it. If you have a really clever design that doesnt use the metal frame then I'd still like to hear that too, will just have to find another job for the metal if I go ahead and use it.

Monday, 1 June 2009

Curtain Material

Saturday we went to our local linen store Dunelm's, and searched for some bright and cheerful material to use as curtains, and maybe cushion covers, we wanted something that would tie the existing colours together, but looked like traditional VW Camper curtains, I think we found just the thing ! :) All the colours used in the camper, and checkered similar to the original Bay campers. We bought 7 meters at £5.99 a meter, hopefully it should be enough for the curtains needed, plus 4 cushions and if any is left over maybe a small table cloth. Not sure what table we are likely to have yet, whether I will make one that fits into the floor, or just get a fold up camping table that can be used outside too. Probably the latter.


Didn't get anything else done today again, been so hot, so ended up measuring the parts where the curtain track will go. Im going to buy some aluminium Gliss track, this will apparently bend to where I want it, and will match the aluminium corner pieces that will be on the seating.

Today we also decided that maybe a skylight would be a good idea to vent on hot days, the past couple really hot days have made the decision easy, if the dogs ever have to be in there for any period of time, as well as us, it is going to need it. I am also thinking of fitting a powered vent that would keep the air circulating. Will need to look into it a bit more and see whats available, and if it will fit the roof space I have. So far I have seen a Fiamma Turbo Vent 280, which is a white topped 280mm x 280mm roof vent, that lifts like a caravan vent, but also has a 12v fan built in, so would only need the one hole cutting into the roof, sounds ideal to me, and probably the one I will get, unless I can find a slightly bigger one, I have 18" x 18" to play with so we will see. The Fiamma one is £68.99 for a white one, or £78.99 for a crystal (clear) one. The white one would defuse the sunlight coming through, the crystal one would allow you to see the stars (or rain clouds) when in bed :). This is a pic of the crystal one with 12v fan from the Rainbow Conversions website.


Thats it for today, wont get a chance to do anything else until at least Thursday now, so check back soon :)